整理三款流行的内网穿透工具,frp【开源】,nps【开源】,ngrok【基础版免费】,前两款属于开源产品,需要自行搭建,ngrok属于付费产品,但是基础版,白嫖的足够用了.😄
bore(新起之秀)
github日趋势榜第一,github仓库地址https://github.com/ekzhang/bore
A modern, simple TCP tunnel in Rust that exposes local ports to a remote server, bypassing standard NAT connection firewalls. That’s all it does: no more, and no less.
用完之后,一个词来形容,so easy~
快速安装:
 1
 2
 3
 4
 5
 6
 7
 8
 9
10
11
| # 如果没有cargo,需要提前安装
# debian系
apt install cargo -y
# MacOS
brew install cargo
# 安装bore,依赖于rust
cargo install bore-cli
# -- 此外,cargo还有docker镜像包,运行以下命令可以直接使用
docker run -it --init --rm --network host ekzhang/bore <ARGS>
|
⚠️ 注意:如遇到cargo install过程中出现编译错误(原因是apt仓库中的rust版本太低,bore的最低要求是Rust 1.58.0):
1
| curl --proto '=https' --tlsv1.2 -sSf https://sh.rustup.rs | sh
|
简单使用:
1
2
3
4
5
| # 服务器端
bore server
# 客户端(本地主机)
bore local 8000 --to <YOUR_REMOTE_SERVER_ADDR_OR_IP>
|
添加认证:
1
2
3
4
5
| # on the server
bore server --secret my_secret_string
# on the client
bore local <LOCAL_PORT> --to <TO> --secret my_secret_string
|
效果如下:
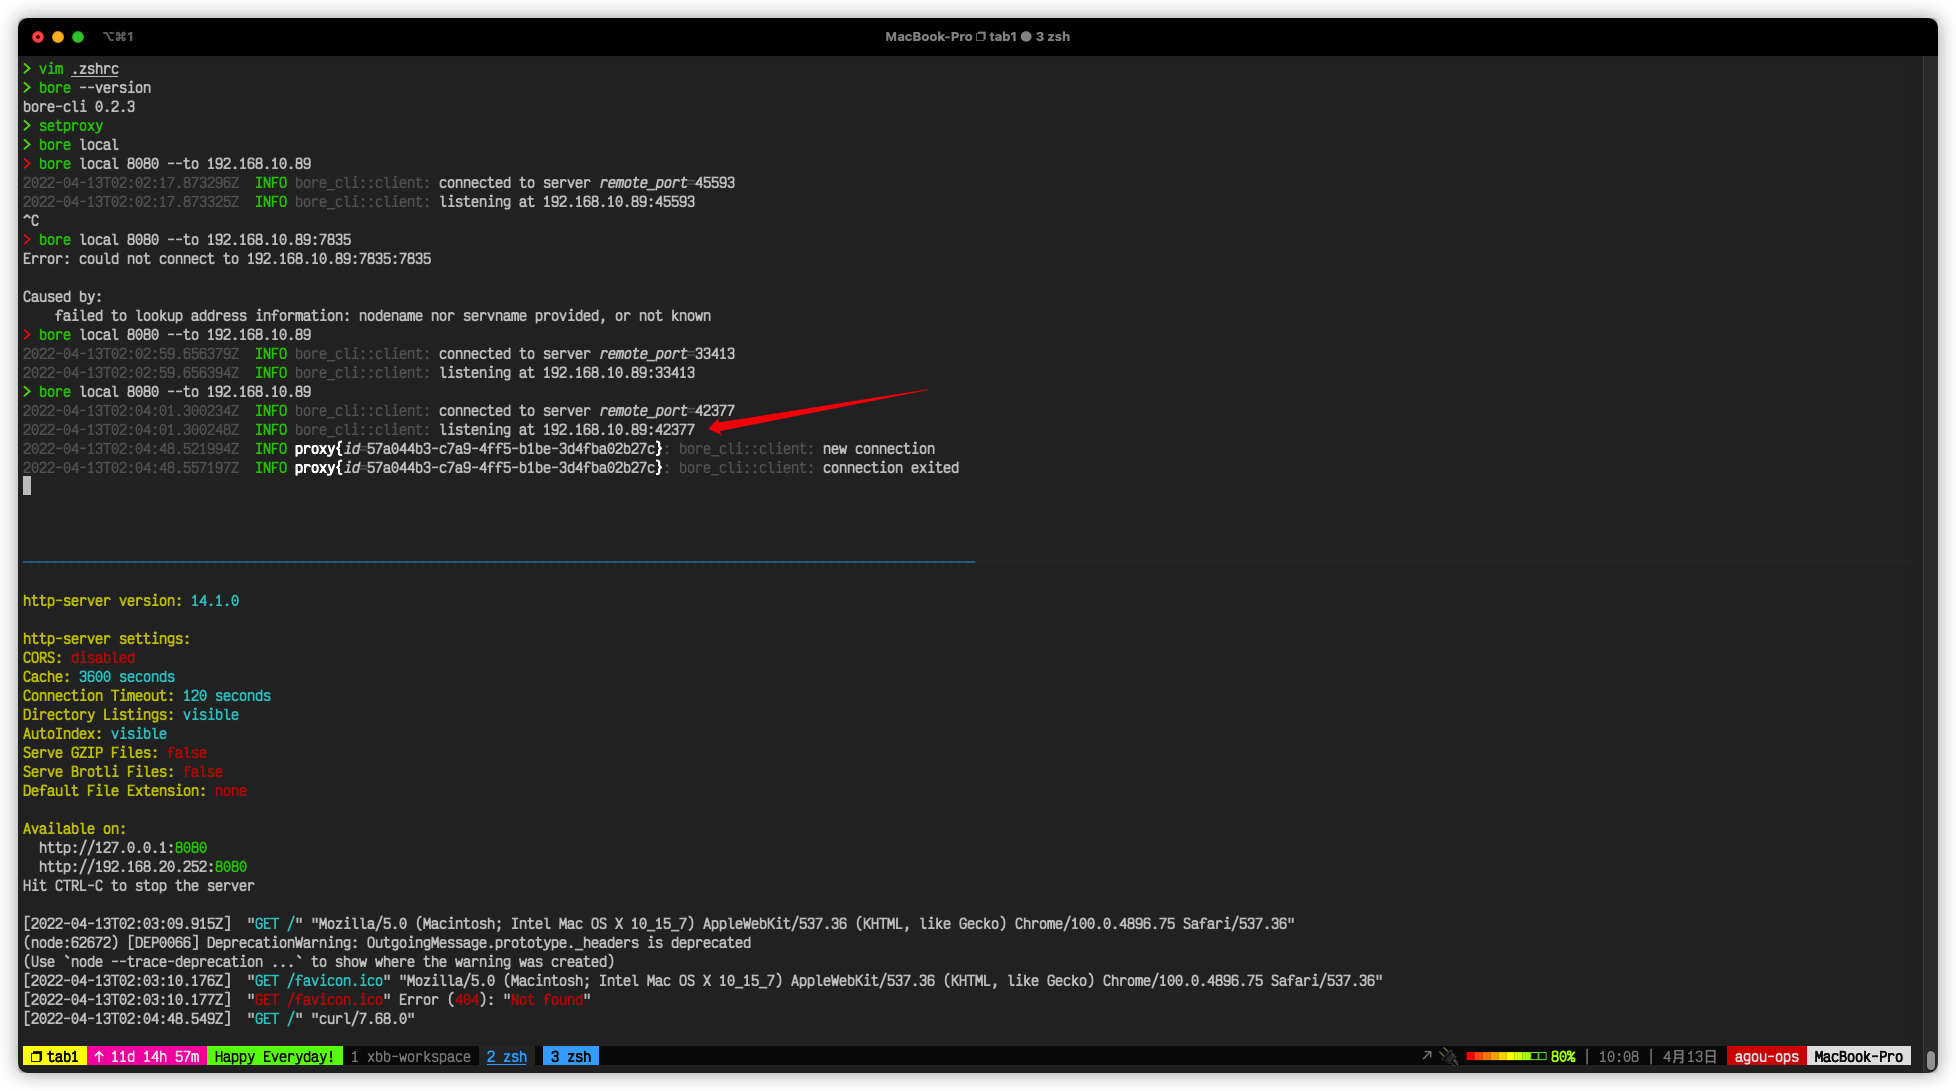
bore服务器端会随机起一个端口映射给客户端。
⚠️ 注意:如果映射完之后发现无法访问,那应该是被你的防火墙拦截了,使用以下命令关闭防火墙:
1
2
3
4
5
6
7
| # 关闭防火墙
systemctl stop firewalld # redhat系,禁止开机自启,systemctl disable掉就可以了,下面debian系也是.
systemctl stop ufw # debian系
# 查看iptables规则
iptables -vnL
# 清空iptables规则
iptables -F
|
如果不想关闭防火墙,那么就需要手动设置规则,这里不是本篇博文的重点,在此不再赘述.
frp
A fast reverse proxy to help you expose a local server behind a NAT or firewall to the internet.
frp 是一个专注于内网穿透的高性能的反向代理应用,支持 TCP、UDP、HTTP、HTTPS 等多种协议。可以将内网服务以安全、便捷的方式通过具有公网 IP 节点的中转暴露到公网。
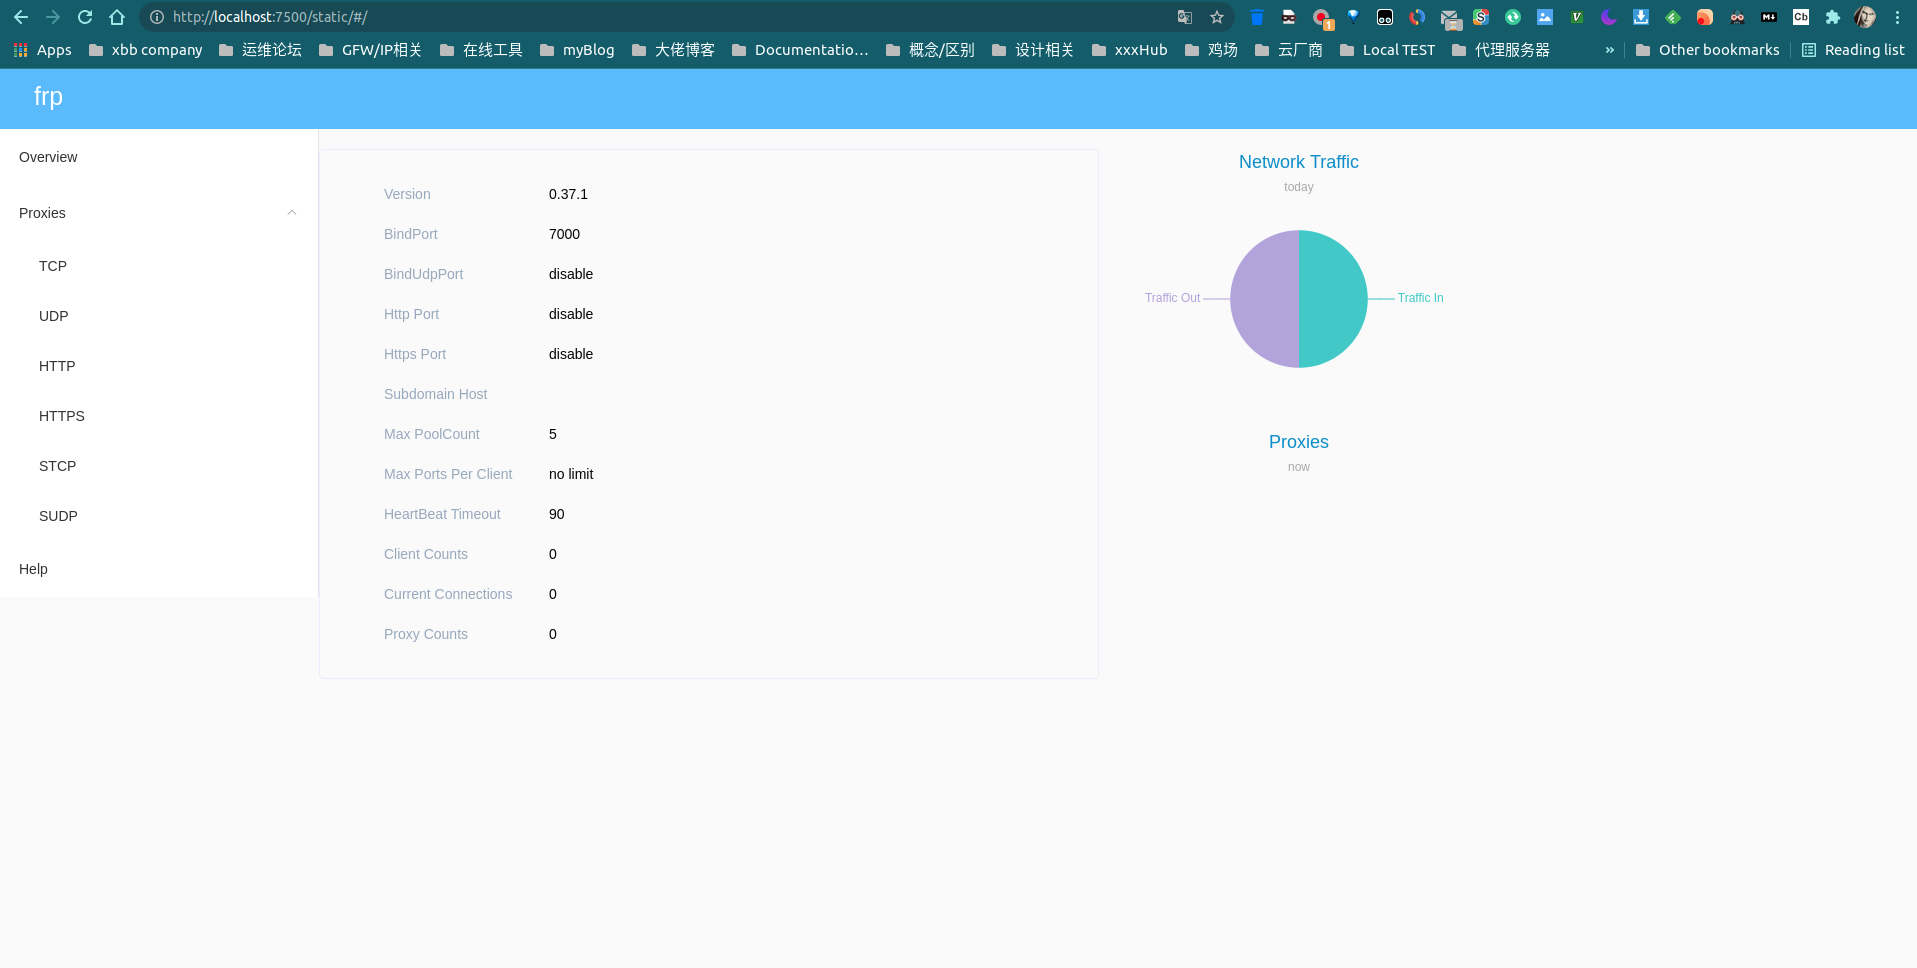
frp架构图:
⚠️frp如果想外网访问,需要带有公网IP的服务器才可以,另外需要安全组放行相应的端口,要不然嗝屁没法正常访问,如果没有公网IP的服务器,建议使用下面要介绍的ngrok。
废话少说,想要了解更多可以去GayHub仓库详细了解,下面开始快速安装步骤:
1
2
3
4
| # frp官方release仓库:https://github.com/fatedier/frp/releases
# 服务端frps客户端frpc二进制包都在一起,所以下面的步骤基本一样
$ wget https://github.com/fatedier/frp/releases/download/v0.37.1/frp_0.37.1_linux_amd64.tar.gz
$ tar xf frp_0.37.1_linux_amd64.tar.g && cd frp_0.37.1_linux_amd64
|
以下列举我常用的服务器端以及客户端配置【以后有增加会更新】:
 1
 2
 3
 4
 5
 6
 7
 8
 9
10
11
12
13
14
15
16
17
18
19
20
21
22
| # --- server
# frps.ini文件内容如下
[common]
bind_port = 7000 # 绑定的端口
token = X56Fdsfx # 用于身份验证,请自行修改,要保证服务端与客户端一致
dashboard_port = 7500 # 面板
# dashboard 用户名密码,默认都为 admin
dashboard_user = admin
dashboard_pwd = admin
# --- client
# frpc.ini文件内容如下
[common]
server_addr = x.x.x.x # 公网IP地址
server_port = 7000 # 与服务器端的`bind_port`地址一致
token = X56Fdsfx # 用于身份验证,请自行修改,要保证服务端与客户端一致
[rdp] # 这里面填的时连接名称,可以在dashboard中直观的分辨出你所穿透的服务
type = tcp
local_ip = 127.0.0.1
local_port = 3389
remote_port = 6000
|
✌️ 验证RDP远程访问内网Windows机器:随便找个RDP客户端工具,使用<PUBLIC_IP>:6000连接即可。
ℹ️小技巧:
1
2
3
4
5
6
7
8
9
| ' 针对于Windows,为了方便使用,我们可以将frp添加为开机启动项,或者注册为服务。
# 添加为开机启动项
' 文件名为:start_frpc.vbs,内容如下所示:
CreateObject("WScript.Shell").Run """D:\frp_windows_amd64\frpc.exe""" & "-c" & """D:\frp_windows_amd64\frpc.ini""",0
' 将该文件放到:C:\Users\<USER_NAME>\AppData\Roaming\Microsoft\Windows\Start Menu\Programs\Startup文件夹里面即可。
# 注册为服务
' 下载一个nssm工具傻瓜式注册服务,然后将服务类型改为自启动即可,这个地方我就略过不详细讲了.
|
- 通过SSH访问内网机器(其实和RDP差不多,就不做解释了)
 1
 2
 3
 4
 5
 6
 7
 8
 9
10
11
12
13
14
15
16
| # --- server
# frps.ini文件内容如下
[common]
bind_port = 7000
# --- client
# frpc.ini文件内容如下
[common]
server_addr = x.x.x.x
server_port = 7000
[ssh]
type = tcp
local_ip = 127.0.0.1
local_port = 22
remote_port = 6000
|
✌️ 验证SSH访问内网机器:
1
| $ ssh -oPort=6000 <USER_NAME>@<PUBLIC_IP> # 如ssh -oPort=6000 agou-ops@69.42.6.43
|
frp 会将请求 <PUBLIC_IP>:6000 的流量转发到内网机器的22端口。
⚠️使用上面的服务直接将SSH暴露于公网之中犹如裸奔,安全隐患极高,使用 stcp(secret tcp) 类型的代理可以避免让任何人都能访问到要穿透的服务,但是访问者也需要运行另外一个 frpc 客户端。其配置文件如下:
 1
 2
 3
 4
 5
 6
 7
 8
 9
10
11
12
13
14
15
16
17
18
19
20
21
22
23
24
25
26
27
28
29
30
31
32
33
34
| # --- server
# frps.ini文件内容如下
[common]
bind_port = 7000
# --- client
# frpc.ini文件内容如下
[common]
server_addr = x.x.x.x
server_port = 7000
[secret_ssh]
type = stcp
# 只有 sk 一致的用户才能访问到此服务
sk = abcdefg
local_ip = 127.0.0.1
local_port = 22
# --- client,想要访问内网ssh的客户端也需要启动frpc
# frpc.ini文件内容如下
[common]
server_addr = x.x.x.x
server_port = 7000
[secret_ssh_visitor]
type = stcp
# stcp 的访问者
role = visitor
# 要访问的 stcp 代理的名字
server_name = secret_ssh
sk = abcdefg
# 绑定本地端口用于访问 SSH 服务
bind_addr = 127.0.0.1
bind_port = 6000
|
✌️验证:访问本地6000端口即可内网穿透到我们所需的另一台内网客户端机器.
使用以上类型stcp的流量会通过服务器,如果希望传输大量数据且流量不经过服务器,可以使用点对点内网穿透xctp,这里我就不过多介绍,感兴趣或者有需要的可以去了解了解。
 1
 2
 3
 4
 5
 6
 7
 8
 9
10
11
12
13
14
15
16
17
18
19
20
21
22
23
24
25
26
27
28
29
30
31
32
33
| # --- server
# frps.ini文件内容如下
[common]
bind_port = 7000
vhost_http_port = 8080
# --- client
# frpc.ini文件内容如下
[common]
server_addr = x.x.x.x
server_port = 7000
[web]
type = http
local_port = 80
custom_domains = agou-ops.cn
[web2]
type = http
local_port = 8080
custom_domains = agou-ops.cn
# 【可选】以下为将本地http服务转换为https服务并对外提供的插件配置
# -----------------------------
plugin = https2http
plugin_local_addr = 127.0.0.1:80
# HTTPS 证书相关的配置
plugin_crt_path = ./server.crt
plugin_key_path = ./server.key
plugin_host_header_rewrite = 127.0.0.1
plugin_header_X-From-Where = frp
# -----------------------------
|
✌️ 验证外网访问内网WEB:
- 将
agou-ops.cn 和 agou-ops.cn 的域名 A 记录解析到 IP x.x.x.x,如果服务器已经有对应的域名,也可以将 CNAME 记录解析到服务器原先的域名。或者可以通过修改 HTTP 请求的 Host 字段来实现同样的效果。 - 通过浏览器访问
http://agou-ops.cn:8080 即可访问到处于内网机器上 80 端口的服务,访问 http://agou-ops.cn:8080 则访问到内网机器上 8080 端口的服务。
 1
 2
 3
 4
 5
 6
 7
 8
 9
10
11
12
13
14
15
16
17
18
19
20
21
| # --- server
# frps.ini文件内容如下
[common]
bind_port = 7000
# --- client
# frpc.ini文件内容如下
[common]
server_addr = x.x.x.x
server_port = 7000
[test_static_file]
type = tcp
remote_port = 6000
plugin = static_file
# 要对外暴露的文件目录
plugin_local_path = /tmp/file
# 用户访问 URL 中会被去除的前缀,保留的内容即为要访问的文件路径
plugin_strip_prefix = static
plugin_http_user = abc
plugin_http_passwd = abc
|
✌️ 验证外网访问内网指定目录:通过浏览器访问 http://x.x.x.x:6000/static/ 来查看位于/tmp/file目录下的文件,会要求输入已设置好的用户名和密码。
编写完配置文件之后,先通过 ./frps -c ./frps.ini 启动服务端,再通过 ./frpc -c ./frpc.ini 启动客户端。如果需要在后台长期运行,建议结合其他工具使用,例如 systemd 和 supervisor。
Done.
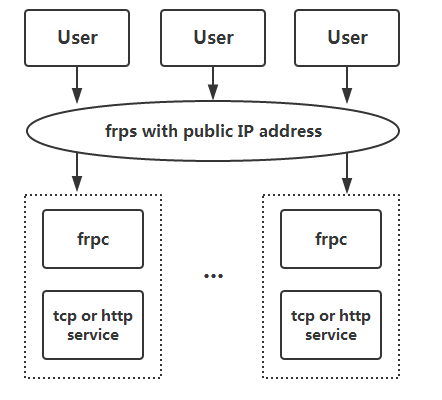
附:Dashboard样例图
该小节部分内容来源于官方文档,详情请查看参考链接。
nps
nps是一款轻量级、高性能、功能强大的内网穿透代理服务器。目前支持tcp、udp流量转发,可支持任何tcp、udp上层协议(访问内网网站、本地支付接口调试、ssh访问、远程桌面,内网dns解析等等……),此外还支持内网http代理、内网socks5代理、p2p等,并带有功能强大的web管理端。
同样,直接快速开始,不过多介绍:
 1
 2
 3
 4
 5
 6
 7
 8
 9
10
11
| # nps的客户端和服务端是分离开的,需要分别单独下载
# 服务端
$ wget https://github.com/ehang-io/nps/releases/download/v0.26.10/linux_amd64_server.tar.gz
$ tar xf linux_amd64_server.tar.gz
$ sudo mv nps /usr/local/bin # 自己做软连接也可以
# 客户端
$ wget https://github.com/ehang-io/nps/releases/download/v0.26.10/linux_amd64_client.tar.gz
$ tar xf linux_amd64_client.tar.gz
$ sudo mv npc /usr/local/bin
|
安装与启动服务端与客户端的连接服务端:
1
2
3
4
5
6
7
8
| # 服务端
$ nps install # 安装,该命令完成之后会在当前目录生成一个conf目录和一个web目录,文件用途显而易见
# 服务端配置文件需要修改的东西很少,按需进行调整即可,终端获取公网ip可以使用curl ifconfig.me或者curl ip.cip.cc等接口获取。
$ sed -i 's/web_host=.*/web_host=<YOUR_PUBLIC_IP>/' nps.conf
$ nps start # 启动
# 客户端连接服务端
$ npc -server=<YOUR_PUBLIC_IP>:8024 -vkey=<客户端的密钥> # 这个8024端口对应server端`nps.conf`中的bridge_port参数
|
停止和重启可用,stop和restart
如果发现没有启动成功,可以使用nps(.exe) stop,然后运行nps.(exe)运行调试,或查看日志(Windows日志文件位于当前运行目录下,linux和darwin位于/var/log/nps.log)
- 访问服务端ip:web服务端口(默认为8080)
- 使用用户名和密码登陆(默认admin/123,正式使用一定要更改)
- 创建客户端
客户端密钥可以从web页面中获取:
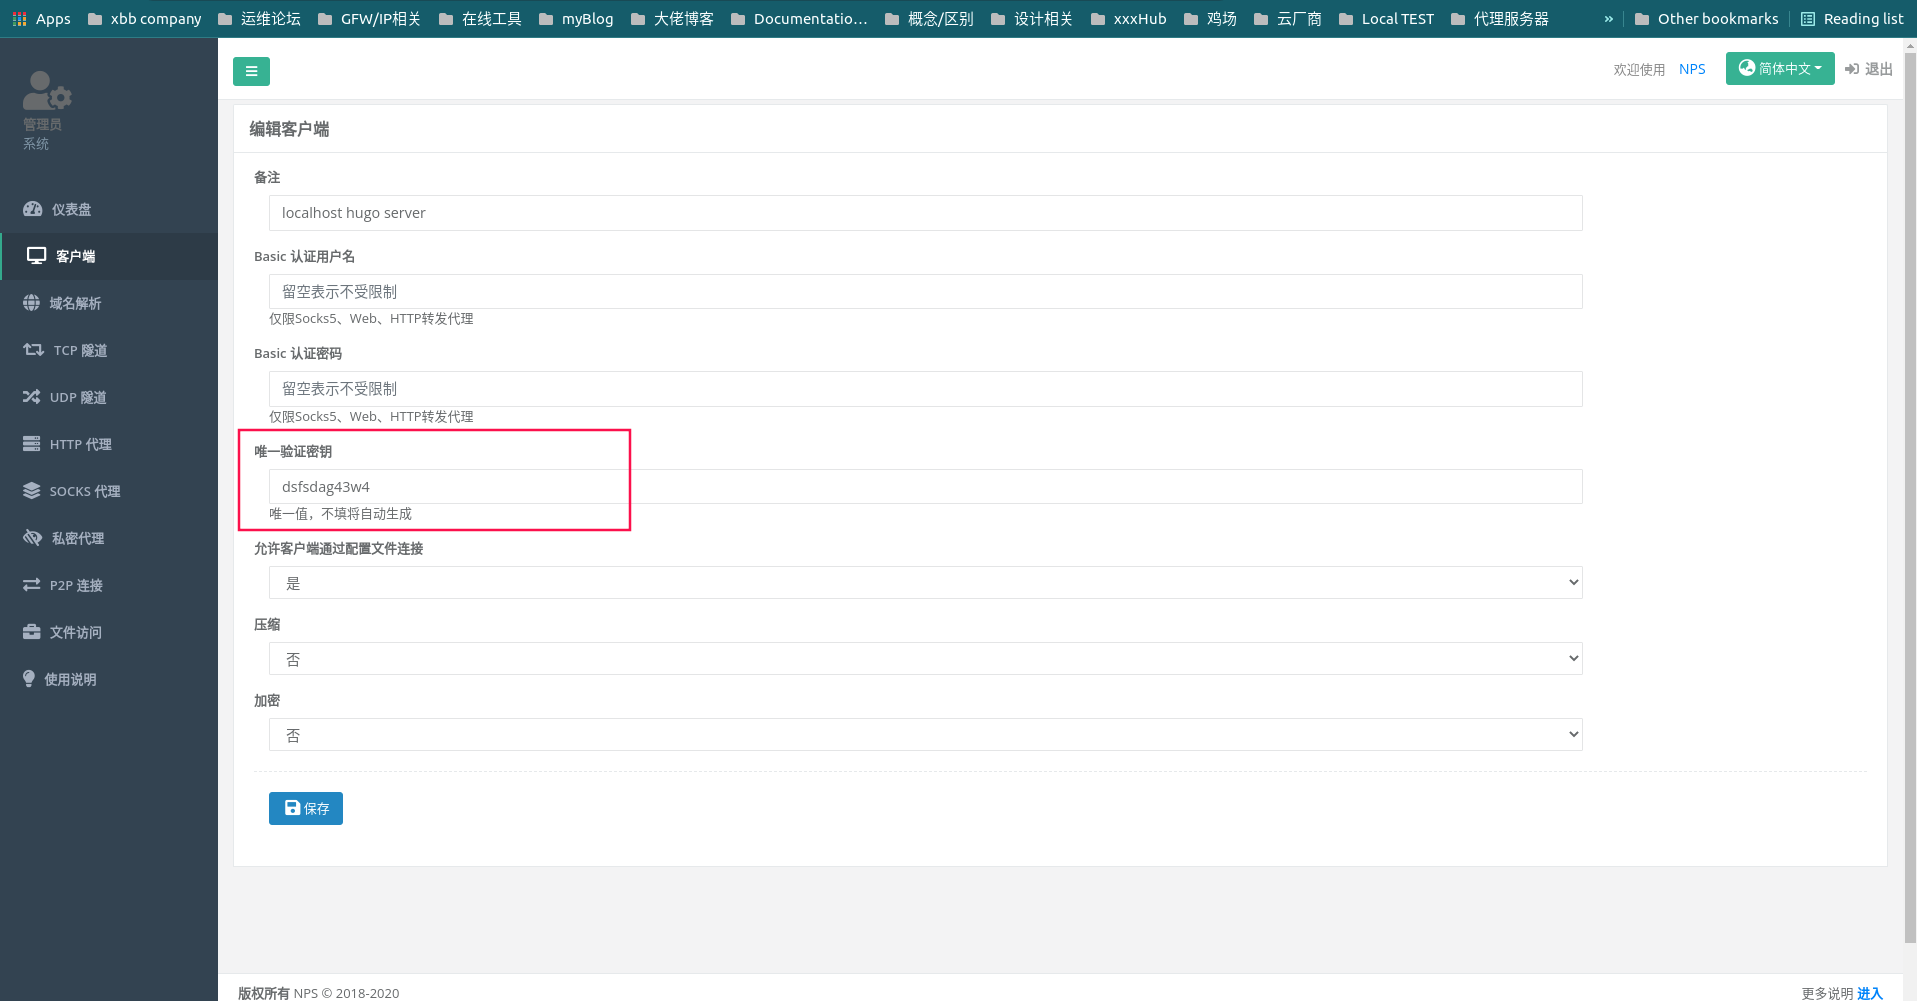
上图也是新建客户端的步骤(说是步骤,基本是没有,xd)。
新建完客户端之后就可以建立隧道连接了,这里以HTTP服务为例:
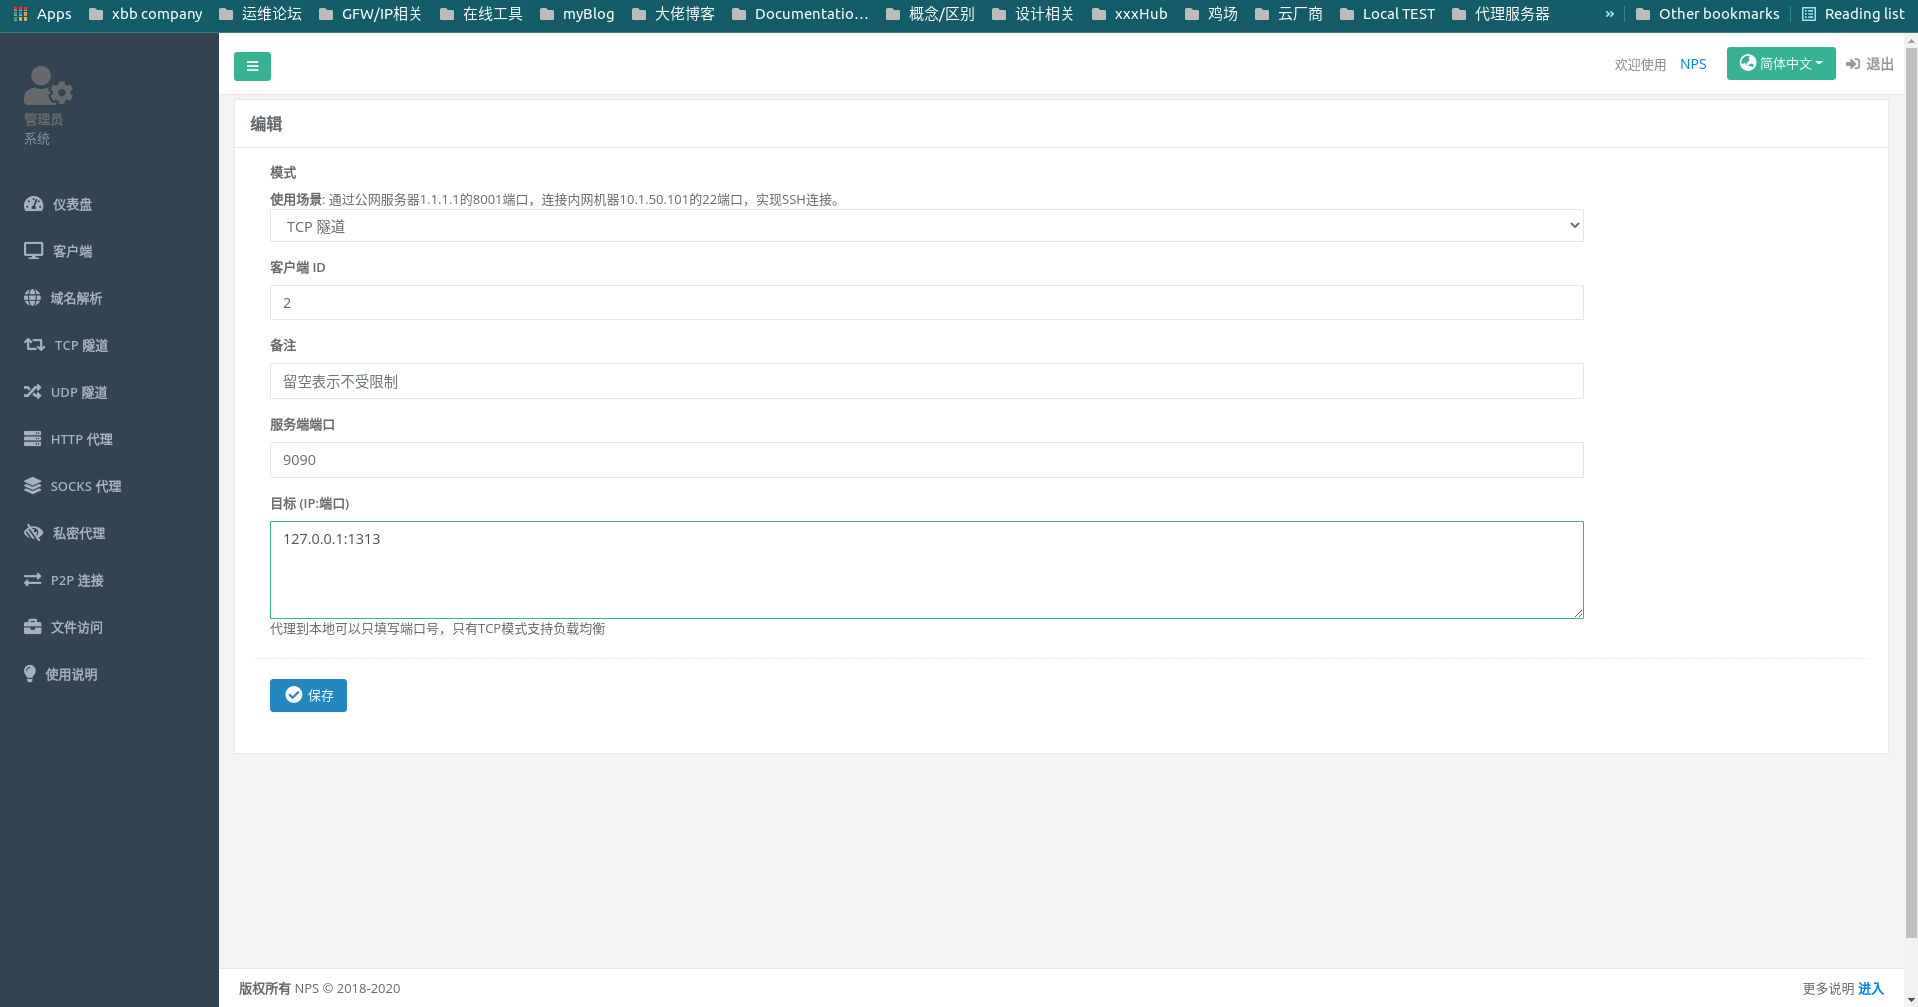
傻瓜式配置,我就不多说了,客户端ID即为你上面创建的那个,可以去客户端页面中进行查看。
✌️验证:访问公网的9090端口,即访问的是内网指定IP和端口的应用。
附:nps.conf配置文件名称及含义(来自官方文档):
| 名称 | 含义 |
|---|
| web_port | web管理端口 |
| web_password | web界面管理密码 |
| web_username | web界面管理账号 |
| web_base_url | web管理主路径,用于将web管理置于代理子路径后面 |
| bridge_port | 服务端客户端通信端口 |
| https_proxy_port | 域名代理https代理监听端口 |
| http_proxy_port | 域名代理http代理监听端口 |
| auth_key | web api密钥 |
| bridge_type | 客户端与服务端连接方式kcp或tcp |
| public_vkey | 客户端以配置文件模式启动时的密钥,设置为空表示关闭客户端配置文件连接模式 |
| ip_limit | 是否限制ip访问,true或false或忽略 |
| flow_store_interval | 服务端流量数据持久化间隔,单位分钟,忽略表示不持久化 |
| log_level | 日志输出级别 |
| auth_crypt_key | 获取服务端authKey时的aes加密密钥,16位 |
| p2p_ip | 服务端Ip,使用p2p模式必填 |
| p2p_port | p2p模式开启的udp端口 |
| pprof_ip | debug pprof 服务端ip |
| pprof_port | debug pprof 端口 |
| disconnect_timeout | 客户端连接超时,单位 5s,默认值 60,即 300s = 5mins |
ngrok
首先注册一个ngrok账号,官网地址,注册登录之后会跳转一个快速开始页面,如下所示,安装对应操作系统及架构的二进制包即可使用:
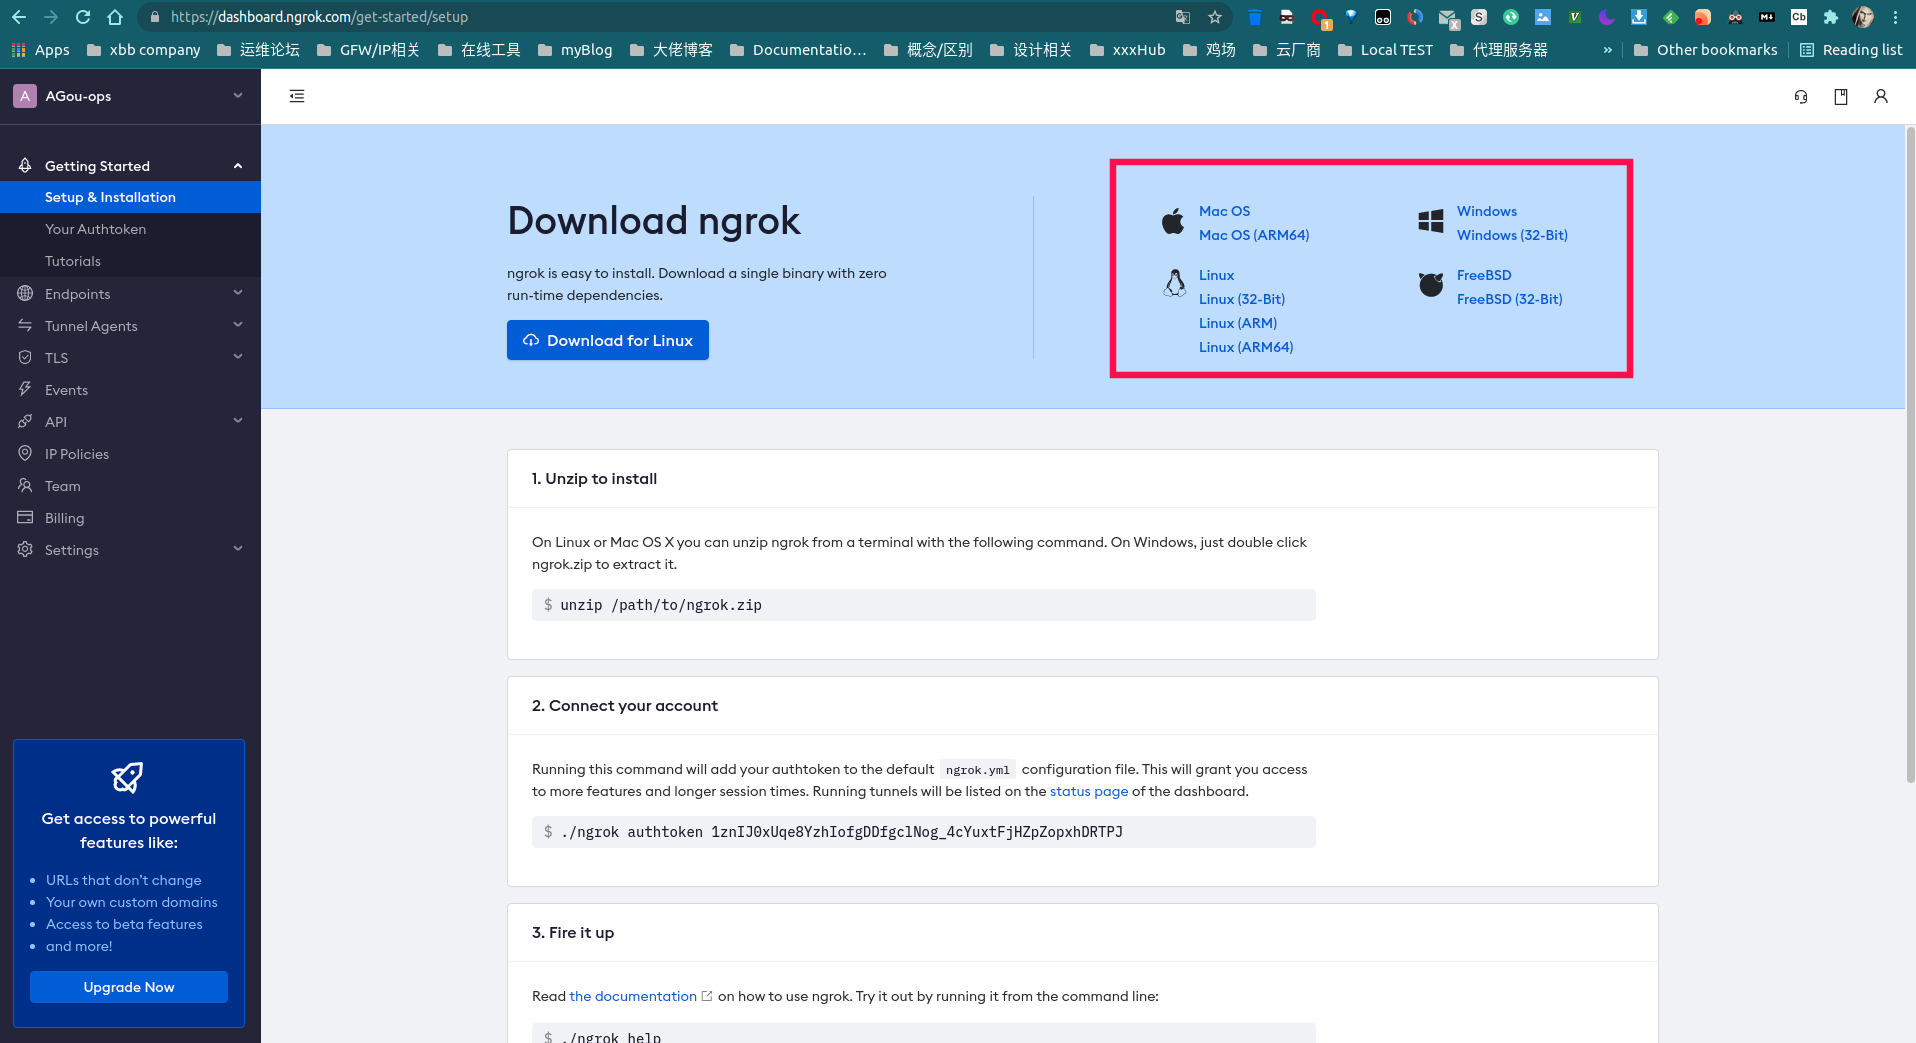
官网讲的很详细,这里我就简单的把要使用的命令罗列出来,方便使用:
1
2
3
4
5
6
7
8
9
| # 这里以linux系统为例
$ wget https://bin.equinox.io/c/4VmDzA7iaHb/ngrok-stable-linux-amd64.zip
$ unzip ngrok-stable-linux-amd64.zip
$ sudo mv ngrok /usr/local/bin
# 验证ngrok是否成功安装
$ ngrok version
ngrok version 2.3.40
# 获取你的token,https://dashboard.ngrok.com/get-started/your-authtoken
$ ngrok authtoken <YOUR_TOKEN_HERE> # 该命令执行之后会在用户家目录生成一个token文件,路径为~/.ngrok2/ngrok.yml
|
这里我随便起个web服务,以我的博客hugo为例:
1
2
3
| $ cd myWeb/myBlog && hugo server # hugo默认会监听在本地localhost:1313端口
# 启用一个http隧道来外网远程访问本地博客
$ ngrok http 1313
|
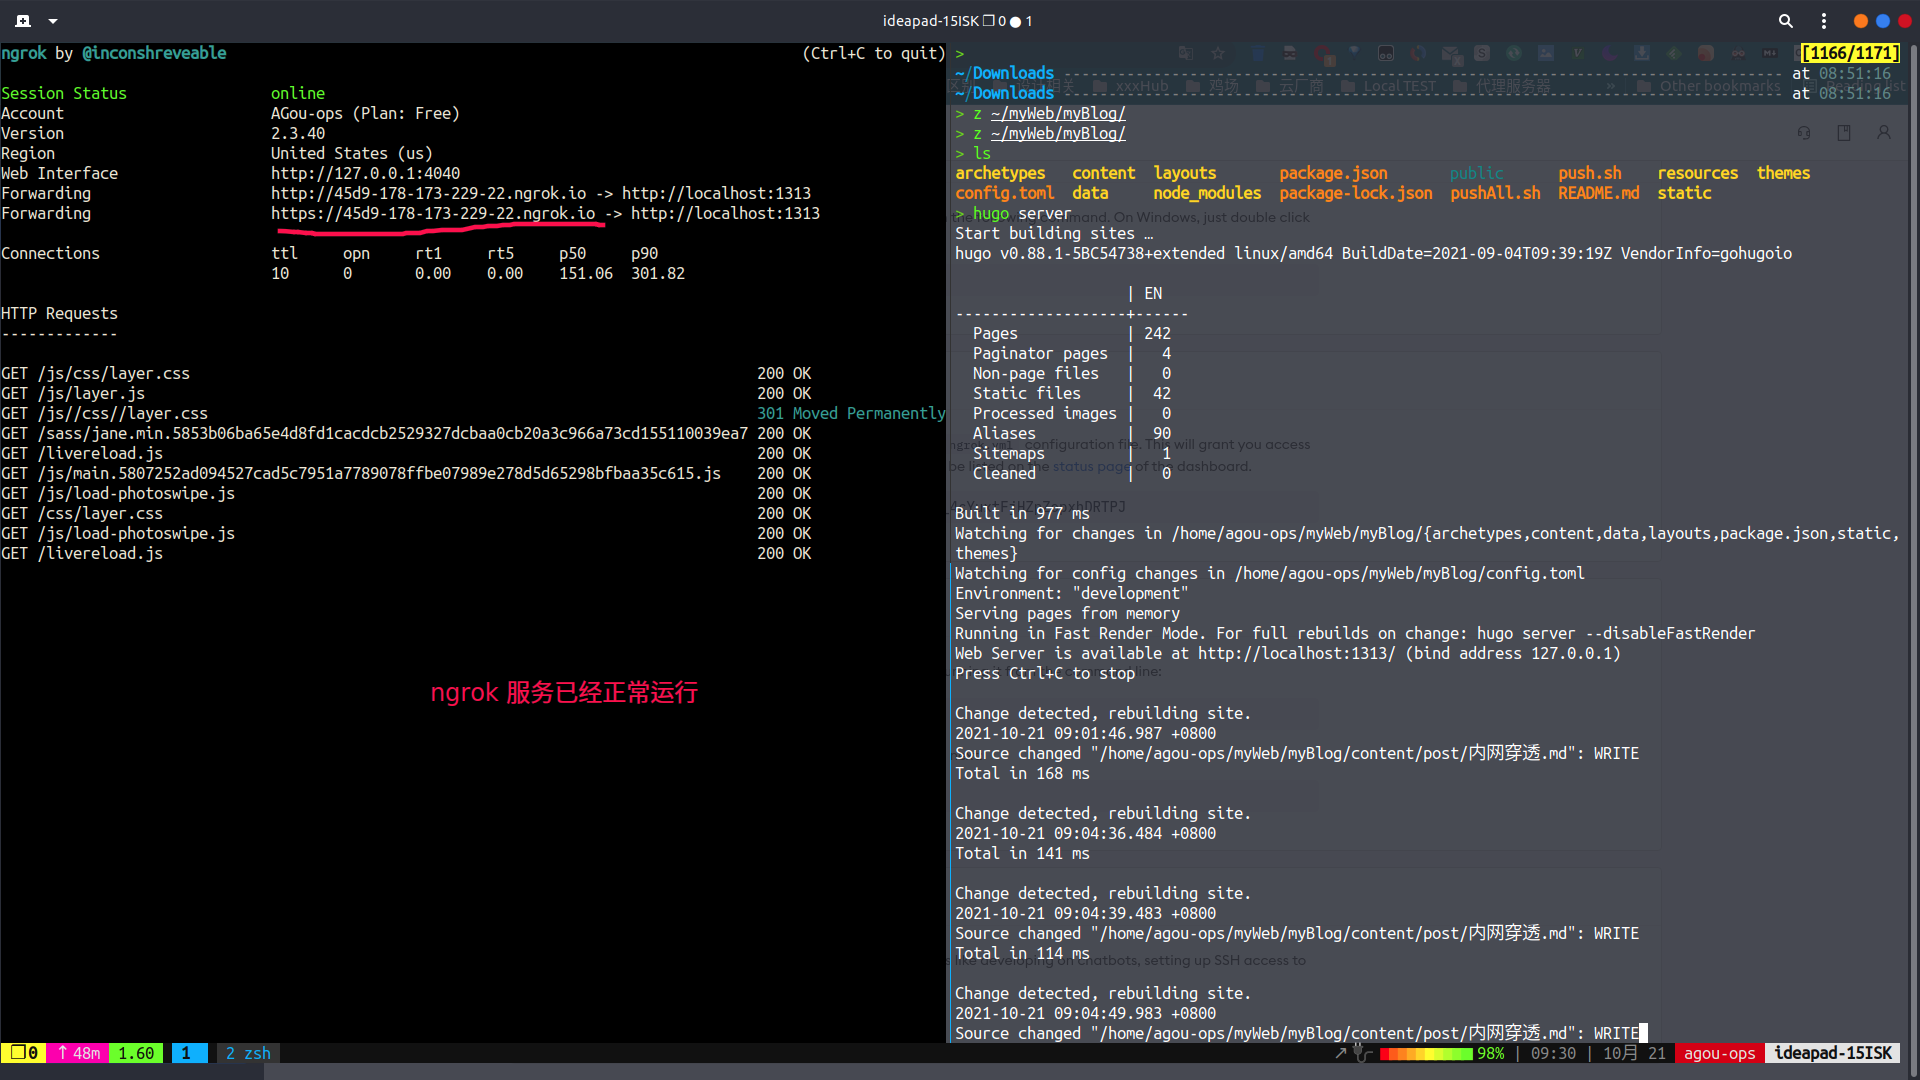
可以看到ngrok服务已经正常运行,而且给出了远程访问的http地址和https地址,复制到浏览器即可外网远程访问本地web服务.
此外,ngrok还内置了一个web接口,即图上的Web Interface,默认地址是http://127.0.0.1:4040
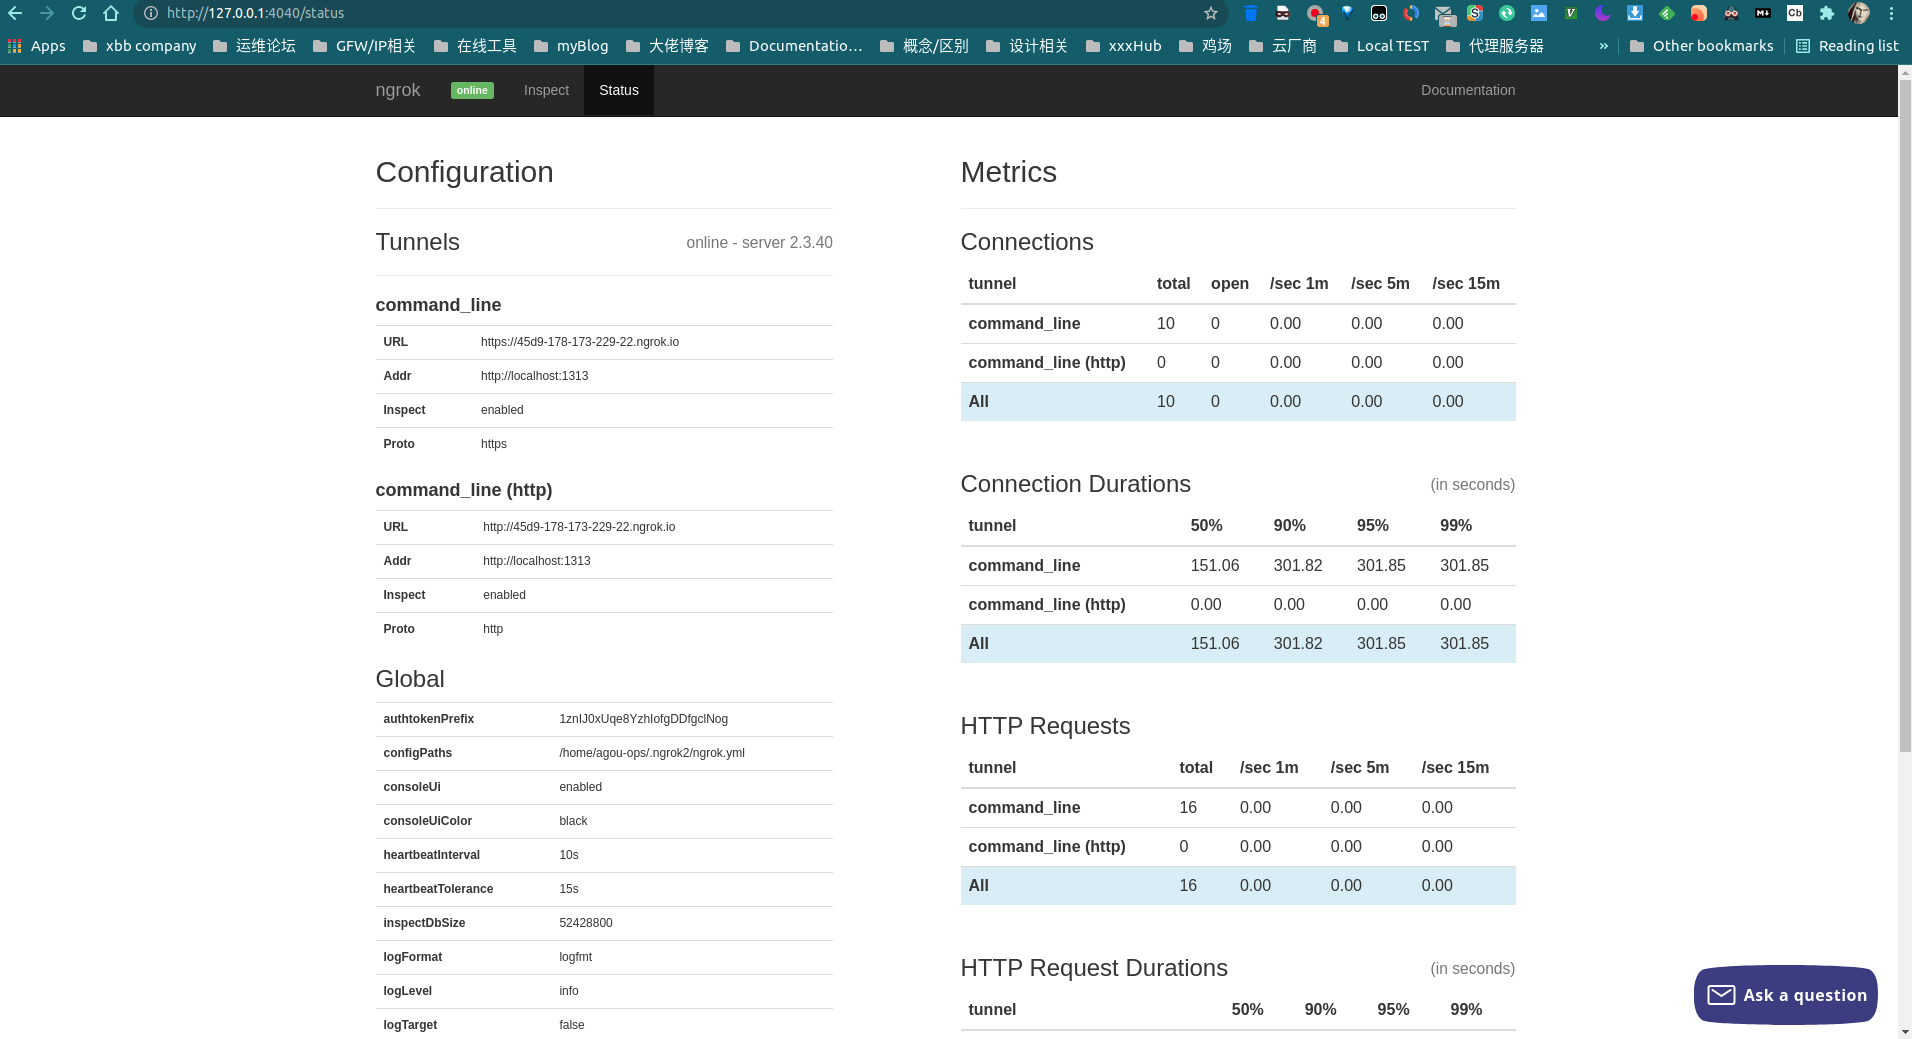
可以看到ngrok的一些状态以及一些对资源的分析内容。
总之,ngrok非常的方便易用,最重要的一点是无需自备服务器,开箱即用,ngrok还提供有其他增强型功能,比如自定义域名、IP黑白名单、隧道客户端、TLS、IP规则等等,但这些都是付费内容,想白嫖的就别想了. 😆
参考链接
