Git 钩子和其它版本控制系统一样,Git 能在特定的重要动作发生时触发自定义脚本。
有两组这样的钩子:客户端的和服务器端的。 客户端钩子由诸如提交和合并这样的操作所调用,而服务器端钩子作用于诸如接收被推送的提交这样的联网操作。 你可以随心所欲地运用这些钩子。
安装钩子
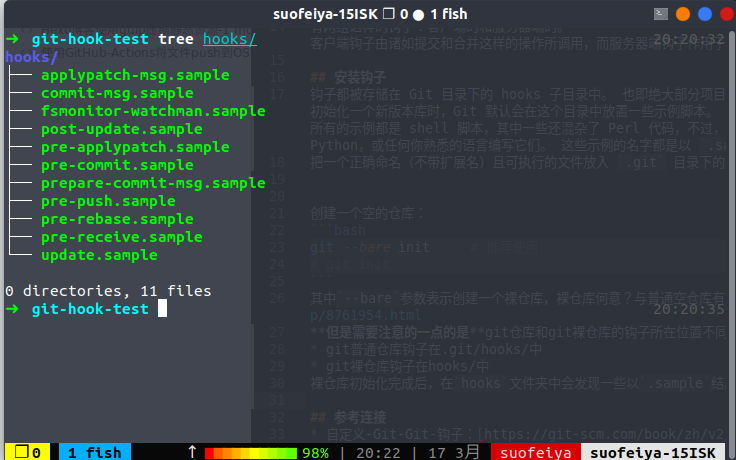
钩子都被存储在 Git 目录下的 hooks 子目录中。 也即绝大部分项目中的 .git/hooks 。 当你用 git init 初始化一个新版本库时,Git 默认会在这个目录中放置一些示例脚本。 这些脚本除了本身可以被调用外,它们还透露了被触发时所传入的参数。 所有的示例都是 shell 脚本,其中一些还混杂了 Perl 代码,不过,任何正确命名的可执行脚本都可以正常使用 —— 你可以用 Ruby 或 Python,或任何你熟悉的语言编写它们。 这些示例的名字都是以 .sample 结尾,如果你想启用它们,得先移除这个后缀。
把一个正确命名(不带扩展名)且可执行的文件放入 .git 目录下的 hooks 子目录中,即可激活该钩子脚本。 这样一来,它就能被 Git 调用。
创建一个空的仓库:
1
2
| git --bare init # 推荐使用
# git init
|
其中--bare参数表示创建一个裸仓库,裸仓库何意?与普通空仓库有有什么区别?参考:https://www.cnblogs.com/irockcode/p/8761954.html
但是需要注意的一点的是git仓库和git裸仓库的钩子所在位置不同:
- git普通仓库钩子在.git/hooks/中
- git裸仓库钩子在hooks/中
裸仓库初始化完成后,在hooks文件夹中会发现一些以.sample结尾的实例文件:
客户端钩子简单示例
使用commit-msg钩子实现commit信息字符数限制(实际可能没什么卵用,仅作为学习参考)
- 编辑
.git/hooks/commit-msg文件如下:
 1
 2
 3
 4
 5
 6
 7
 8
 9
10
11
| ➜ git-hook-test git:(master) ✗ cat .git/hooks/commit-msg 20:55:37
#!/bin/sh
MSG=`awk '{printf("%s",$0)}' $1`
if [ ${#MSG} -lt 5 ]
then
echo "-------------------------------------------------------------------"
echo "commit message 只有${#MSG}字符,不符合要求"
echo "message的长度不能小于5, 本次提交失败,请完善commit message,再提交"
echo "-------------------------------------------------------------------"
exit 1
fi
|
- 为
commit-msg文件添加执行权限:
1
| chmod u+x .git/hooks/commit-msg
|
- 生成一次提交信息:
1
2
3
4
5
6
| ➜ git-hook-test git:(master) ✗ git add . 21:00:48
➜ git-hook-test git:(master) ✗ git commit -m "test"
-------------------------------------------------------------------
commit message 只有4字符
message的长度不能小于5, 本次提交失败,请完善commit message,再提交
-------------------------------------------------------------------
|
不满足最低5字符要求,提交失败。
服务端钩子简单示例
使用post-receive将代码自动部署到服务器
流程大致如下:在服务器端创建一个 Git 仓库(repository),然后将本地的文件使用git push上传到这个仓库后,将上传到Git 仓库的文件,自动复制到服务器里网站目录文件夹下。
- 在服务器端初始化一个空的Git仓库
1
| git init --bare myblog.git
|
- 在
hooks目录中创建post-receive文件,并给予执行权限
1
2
| cd hooks/
touch post-receive;chmod u+x post-receive
|
- 编辑
post-receive文件内容如下:
 1
 2
 3
 4
 5
 6
 7
 8
 9
10
| [root@localhost hooks]# cat post-receive
#!/bin/bash -l
GIT_REPO=/root/myblog.git
TMP_GIT_CLONE=/tmp/myblog
PUBLIC_WWW=/var/www/html
rm -rf ${TMP_GIT_CLONE}
git clone $GIT_REPO $TMP_GIT_CLONE
cd $TMP_GIT_CLONE
rm -rf ${PUBLIC_WWW}/*
cp -rf ${TMP_GIT_CLONE}/* ${PUBLIC_WWW}
|
- 本地添加远程Git仓库并进行测试
1
2
3
4
5
6
7
8
9
| ➜ test git:(master) ✗ git remote add deploy ssh://root@172.16.224.128:/root/myblog.git 21:20:35
➜ test git:(master) ✗ git add . 21:20:52
➜ test git:(master) ✗ git commit -m "auto deploy test" 21:21:01
[master (root-commit) 26fde86] auto deploy test
2 files changed, 1 insertion(+)
create mode 100644 index.html
create mode 100644 testfile
➜ test git:(master) git push --set-upstream deploy master 21:28:19
|
在git服务器端查看post-receive是否成功运行
1
2
3
4
5
6
| [root@localhost ~]# cd /var/www/html/
[root@localhost html]# ls
index.html testfile
[root@localhost html]# cat index.html
auto deploy
auto deploy
|
- 将代码推送指定分支:
 1
 2
 3
 4
 5
 6
 7
 8
 9
10
11
12
13
14
15
16
17
| #!/bin/bash -l
while read oldrev newrev ref
do
branch=`echo $ref | cut -d/ -f3`
if [ "master" == "$branch" ] || [ "production" == "$branch" ]; then
GIT_REPO=/root/myblog.git
TMP_GIT_CLONE=/tmp/myblog
PUBLIC_WWW=/var/www/html
rm -rf ${TMP_GIT_CLONE}
git clone $GIT_REPO $TMP_GIT_CLONE
cd $TMP_GIT_CLONE
unset GIT_DIR
git checkout $branch
rm -rf ${PUBLIC_WWW}/*
cp -rf ${TMP_GIT_CLONE}/* ${PUBLIC_WWW}
fi
done
|
更多钩子参考:https://git-scm.com/book/zh/v2/%E8%87%AA%E5%AE%9A%E4%B9%89-Git-Git-%E9%92%A9%E5%AD%90
参考链接
