# Prometheus + Consul(服务发现)
# 单机部署测试
# Consul 分布式集群搭建
Consul 下载与基础配置参考 [Consul 入门](./Consul 入门.md)
由于手头资源有限,故将集群部署到一台主机之上的不同端口来模拟集群.
环境:
| 角色 | 主机 |
|---|---|
| leader、node01 | 172.16.1.132:8500 |
| follower01、node02 | 172.16.1.132:8501 |
| follower02、node03 | 172.16.1.132:8502 |
首先建立存放数据目录:mkdir -pv /data/prometheus/consul/consul0{1..3}
⚠️**注意:**以下 json 格式文件中的注释内容需要在应用的时候去掉,在此仅为了方便理解.
配置 leader 实例,新建配置文件 consul01.json ,内容如下 :
{
  "datacenter": "dc1",
  "data_dir": "/data/prometheus/consul/consul01",   // 本地存放数据的目录
  "log_level": "INFO",
  "server": true,     // 以server身份启动实例
  "node_name": "node1",
  "ui": true,     // 是否可以访问ui界面
  "bind_addr": "172.16.1.132",
  "client_addr": "0.0.0.0",
  "advertise_addr": "172.16.1.132",     // 集群广播地址
  "bootstrap_expect": 3,      // 集群最少成员数
  "ports":{
    "http": 8500,
    "dns": 8600,
    "server": 8300,
    "serf_lan": 8301,
    "serf_wan": 8302
    }
}
2
3
4
5
6
7
8
9
10
11
12
13
14
15
16
17
18
19
后台启动node01:
nohup consul agent -config-dir=consul01.json > ./consul01.log 2>&1 &
配置follower01,新建配置文件consul02.json,内容如下:
{
  "datacenter": "dc1",
  "data_dir": "/data/prometheus/consul/consul02",   // 改为consul03
  "log_level": "INFO",
  "server": true,
  "node_name": "node2",     // 改为node03
  "ui": true,
  "bind_addr": "172.16.1.132",
  "client_addr": "0.0.0.0",
  "advertise_addr": "172.16.1.132",
  "bootstrap_expect": 3,
  "ports":{
    "http": 8501,   // 改为8502
    "dns": 8601,    // 改为8602
    "server": 8310,   // 改为8320
    "serf_lan": 8311, // 改为8321
    "serf_wan": 8312  // 改为8322
    }
}
2
3
4
5
6
7
8
9
10
11
12
13
14
15
16
17
18
19
配置follower02与上面配置follower01类似,不再赘述
后台启动follower01和follower02:
nohup consul agent -config-dir=consul02.json -join 172.16.1.132:8301 > ./consul02.log 2>&1 &
nohup consul agent -config-dir=consul03.json -join 172.16.1.132:8301 > ./consul03.log 2>&1 &
2
查看各成员启动状态:
[root@master consul]\# consul members
Node    Address            Status  Type    Build  Protocol  DC   Segment
node01  172.16.1.132:8301  alive   server  1.7.2  2         dc1  <all>
node02  172.16.1.132:8311  alive   server  1.7.2  2         dc1  <all>
node03  172.16.1.132:8321  alive   server  1.7.2  2         dc1  <all>
# 查看集群状态及角色信息
[root@master consul]\# consul operator raft list-peers
Node    ID                                    Address            State     Voter  RaftProtocol
node01  767fbfc2-0c11-0c23-989a-cbf51c6af15b  172.16.1.132:8300  leader    true   3
node02  4a0a188a-aafe-24c2-1dc5-62f321671573  172.16.1.132:8310  follower  true   3
node03  77926cab-0bbb-5c4a-5976-e3b354915c1e  172.16.1.132:8320  follower  true   3
2
3
4
5
6
7
8
9
10
11
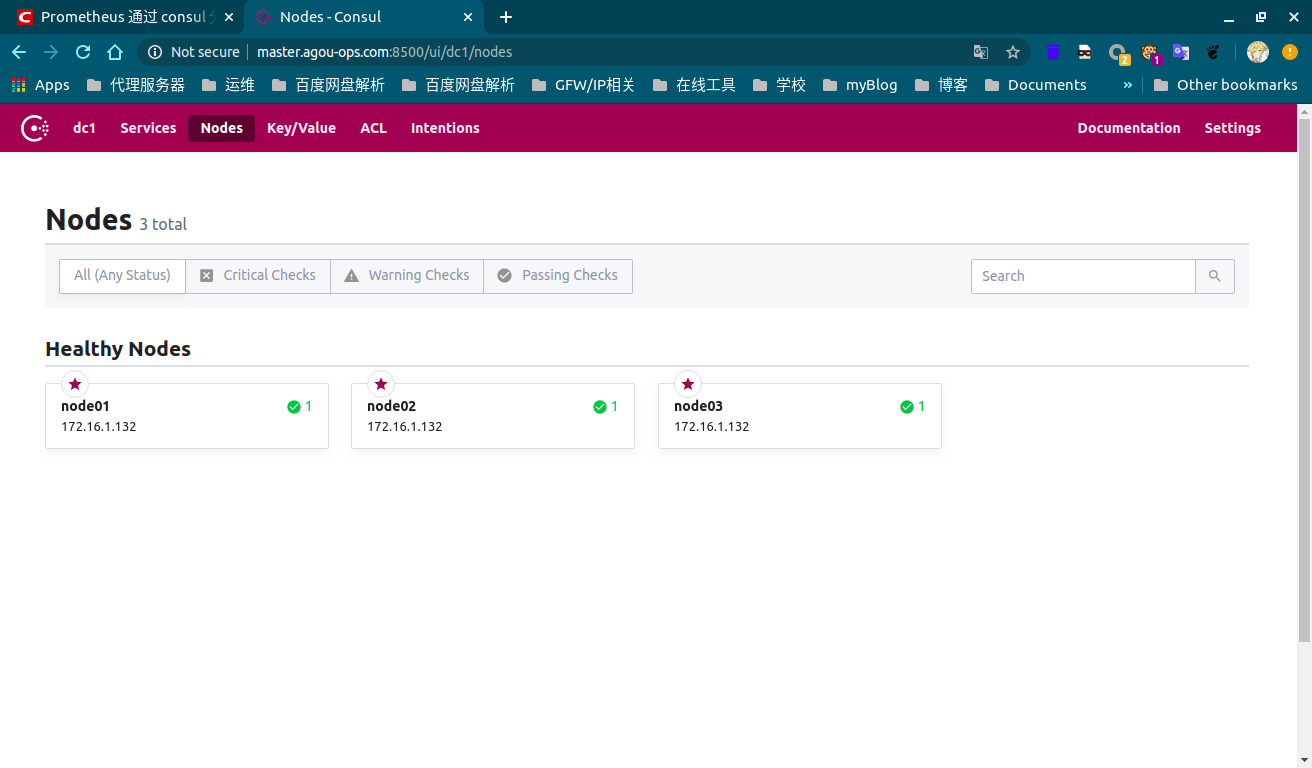
此时,你可以访问任意一个节点,查看其健康状况,http://localhost:8500 或 http://localhost:8501 或 http://localhost:8502
# 配置 Prom 实现自动服务发现
接下来,我们配置Prometheus来使用Consul 集群来实现自动服务发现,目的就是能够将添加的服务自动发现到 Prometheus的 Targets 中, Prometheus 通过 consul 实现自动服务发现 中的配置,在修改 Prometheus 配置之前,我们需要往 Consul 集群中注册一些数据。首先,我们注册一个node-exporter-172.16.1.132的服务,新建 service-1.json如下:
{
  "ID": "node-exporter",
  "Name": "node-exporter-172.16.1.132",
  "Tags": [
    "node-exporter"
  ],
  "Address": "172.16.1.132",
  "Port": 9100,
  "Meta": {
    "app": "spring-boot",
    "team": "appgroup",
    "project": "bigdata"
  },
  "EnableTagOverride": false,
  "Check": {
    "HTTP": "http://172.16.1.132:9100/metrics",
    "Interval": "10s"
  },
  "Weights": {
    "Passing": 10,
    "Warning": 1
  }
}

# 调用 API 注册服务
curl --request PUT --data @service-1.json http://172.16.1.132:8500/v1/agent/service/register?replace-existing-checks=1
2
3
4
5
6
7
8
9
10
11
12
13
14
15
16
17
18
19
20
21
22
23
24
25
26
然后,我们再注册一个 cadvisor-exporter-172.16.1.132 的服务,新建 service-2.json 并执行如下命令:
{
  "ID": "cadvisor-exporter",
  "Name": "cadvisor-exporter-172.16.1.132",
  "Tags": [
    "cadvisor-exporter"
  ],
  "Address": "172.16.1.132",
  "Port": 8080,
  "Meta": {
    "app": "docker",
    "team": "cloudgroup",
    "project": "docker-service"
  },
  "EnableTagOverride": false,
  "Check": {
    "HTTP": "http://172.16.1.132:8080/metrics",
    "Interval": "10s"
  },
  "Weights": {
    "Passing": 10,
    "Warning": 1
  }
}

# 调用 API 注册服务
curl --request PUT --data @service-2.json http://172.16.1.132:8500/v1/agent/service/register?replace-existing-checks=1
2
3
4
5
6
7
8
9
10
11
12
13
14
15
16
17
18
19
20
21
22
23
24
25
26
注意,注册 API 之前,要先将服务启动起来,这里为了方便起见,使用 Docker 启动这两个测试服务:
docker run -d -p 9100:9100 --name node-exporter prom/node-exporter
docker run -d -p 8080:8080 --name cadvisor-exporter google/cadvisor
2
注册完毕后,打开 Consul 的 web 界面进行查看,http://localhost:8500

# 配置并启动 Prom
修改 Prom 的配置文件prometheus.yml,内容如下:
global:
  scrape_interval:     15s
  evaluation_interval: 15s

scrape_configs:
  - job_name: 'prometheus'
    scrape_interval:     5s
    static_configs:
      - targets: ['localhost:9090']

  - job_name: 'consul-node-exporter'
    consul_sd_configs:
      - server: '172.16.1.132:8500'		# nginx负载均衡,改为172.16.1.132
        services: []
    relabel_configs:
      - source_labels: [__meta_consul_tags]
        regex: .*node-exporter.*
        action: keep
      - regex: __meta_consul_service_metadata_(.+)
        action: labelmap

  - job_name: 'consul-cadvisor-exproter'
    consul_sd_configs:
      - server: '172.16.1.132:8501'		# nginx负载均衡,改为172.16.1.132
        services: []
      - server: '172.16.1.132:8502'		#
        services: []
    relabel_configs:
      - source_labels: [__meta_consul_tags]
        regex: .*cadvisor-exporter.*
        action: keep
      - action: labelmap
        regex: __meta_consul_service_metadata_(.+)
2
3
4
5
6
7
8
9
10
11
12
13
14
15
16
17
18
19
20
21
22
23
24
25
26
27
28
29
30
31
32
33
启动Prom 服务:
./prometheus --config.file=prometheus.yml
打开浏览器,访问 http://localhost:9090 进行查看
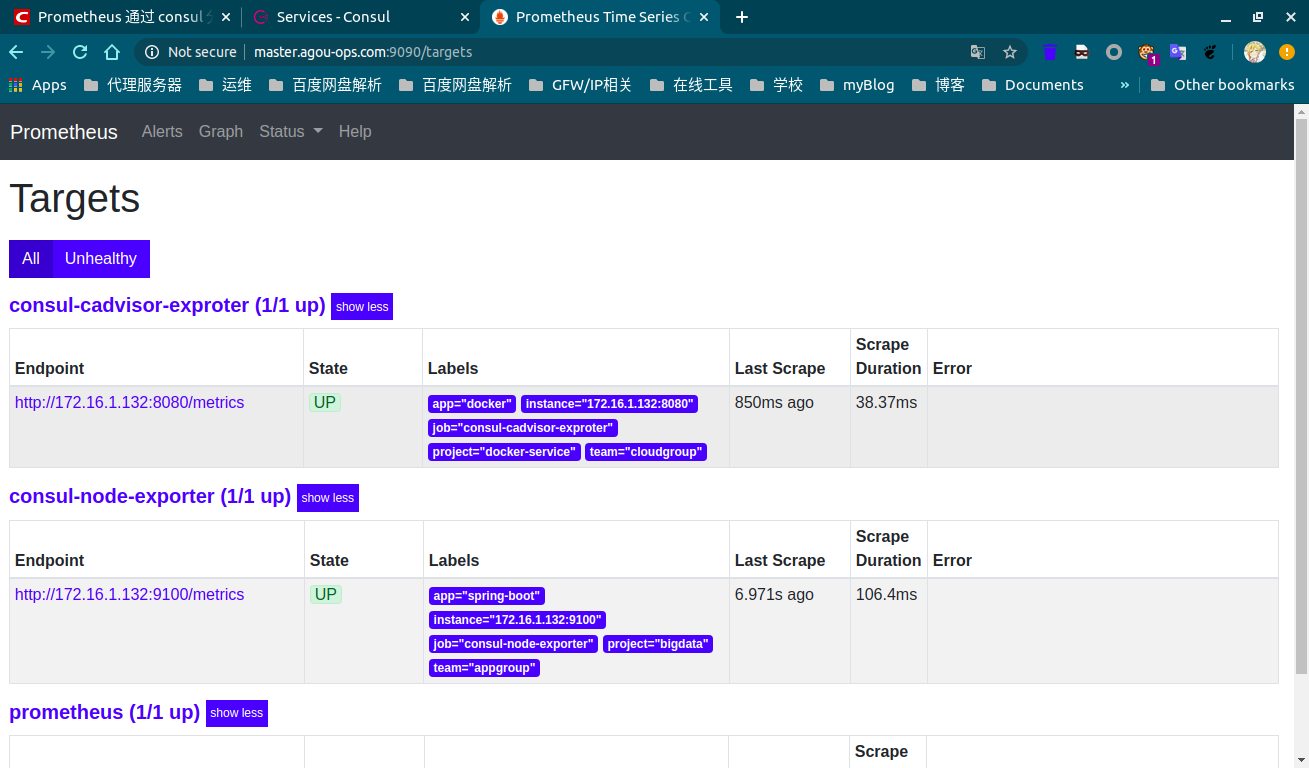
可以看到,妥妥没有问题,这里 consul-node-exporter我配置指向了 node1 Consul 服务地址,consul-cadvisor-exproter 配置指向了node2、node3 Consul服务,二者都能够正确发现之前注册的服务,因为 Consul 集群数据是保持同步的,无论连接哪一个节点,都能够获取到注册的服务信息,同理,我们也可以指定 consul_sd_configs分别指向集群所有节点,这样即使某个节点挂掉,也不会影响 Prometheus 从 Consul 集群其他节点获取注册的服务,从而实现服务的高可用。
# 拓展:配置 nginx 负载均衡 Consul 集群
虽然我们可以将整个 Consul 集群 IP 添加到 Prometheus 的配置中,从而实现 Prometheus 从 Consul 集群获取注册的服务,实现服务的高可用,但是这里有个问题,如果 Consul 集群节点新增或者减少,那么 Prometheus 配置也得跟着修改了,这样不是很友好,我们可以在 Consul 集群前面使用 nginx 反向代理将请求负载均衡到后端 Consul 集群各节点服务上,这样 Prometheus 只需要配置代理地址即可,后期不需要更改了。
编辑 NGX 的配置文件nginx.conf:
upstream service_consul {
    server 172.16.1.132:8500;
    server 172.16.1.132:8501;
    server 172.16.1.132:8502;
    ip_hash;
}

server {
    listen       80;
    server_name _;
    index  index.html index.htm;

    #access_log  /var/log/nginx/host.access.log  main;

    location / {
        add_header Access-Control-Allow-Origin *;
        proxy_next_upstream http_502 http_504 error timeout invalid_header;
        proxy_set_header Host $host;
        proxy_set_header X-Real-IP $remote_addr;
        proxy_set_header X-Forwarded-For $proxy_add_x_forwarded_for;
        proxy_pass http://service_consul;
    }

    access_log /var/log/consul.access.log;
    error_log /var/log/consul.error.log;

    error_page  404              /404.html;

    error_page   500 502 503 504  /50x.html;
    location = /50x.html {
        root   /usr/share/nginx/html;
    }
}
2
3
4
5
6
7
8
9
10
11
12
13
14
15
16
17
18
19
20
21
22
23
24
25
26
27
28
29
30
31
32
33
启动 NGX 服务:systemctl start nginx
然后将 Server 地址指向 NGX 负载均衡器,修改 Prom 配置文件:
压缩篇幅,参考上面完整的`prometheus.yml`注释信息
最后重启prometheus服务即可.
# 使用 Docker 部署
- 首先从 Docker Hub 上拉取镜像:
docker pull consul
在本地启动 Consul 集群进行测试:
# docker run --name consul -d -p 8500:8500 consul
docker run --name consul1 -d -p 8500:8500 -p 8300:8300 -p 8301:8301 -p 8302:8302 -p 8600:8600 consul agent -server -bootstrap-expect 2 -ui -bind=0.0.0.0 -client=0.0.0.0
# 加入consul1
docker run --name consul2 -d -p 8501:8500 consul agent -server -ui -bind=0.0.0.0 -client=0.0.0.0 -join 172.17.0.2
2
3
4
浏览器访问:http://172.16.1.132:8500 进行验证
- 启动
node-exporter和prometheus
参考[Prometheus + Docker](./Prometheus + Docker.md)
容器全部启动完毕只有,差不多大概是这样子:
[root@master ~]\# docker ps
CONTAINER ID        IMAGE                COMMAND                  CREATED                  STATUS                  PORTS                                                                                                       NAMES
594b53c2689c        prom/prometheus      "/bin/prometheus --c…"   Less than a second ago   Up 26 minutes           0.0.0.0:9090->9090/tcp                                                                                      silly_jang
f32263fec6a9        prom/node-exporter   "/bin/node_exporter"     Less than a second ago   Up Less than a second                                                                                                               naughty_pascal
8da8b27d331b        consul               "docker-entrypoint.s…"   5 minutes ago            Up 4 minutes            8300-8302/tcp, 8301-8302/udp, 8600/tcp, 8600/udp, 0.0.0.0:8502->8500/tcp                                    consul2
99b657a2e7a5        consul               "docker-entrypoint.s…"   6 minutes ago            Up 6 minutes            0.0.0.0:8300-8302->8300-8302/tcp, 8301-8302/udp, 0.0.0.0:8500->8500/tcp, 0.0.0.0:8600->8600/tcp, 8600/udp   consul1
2
3
4
5
6
- API 注册服务到 Consul:
curl -X PUT -d '{"id": "node-exporter","name": "node-exporter-172.16.1.132","address": "172.16.1.132","port": 9100,"tags": ["test"],"checks": [{"http": "http://172.16.1.132:9100/metrics", "interval": "5s"}]}' http://172.16.1.132:8500/v1/agent/service/register
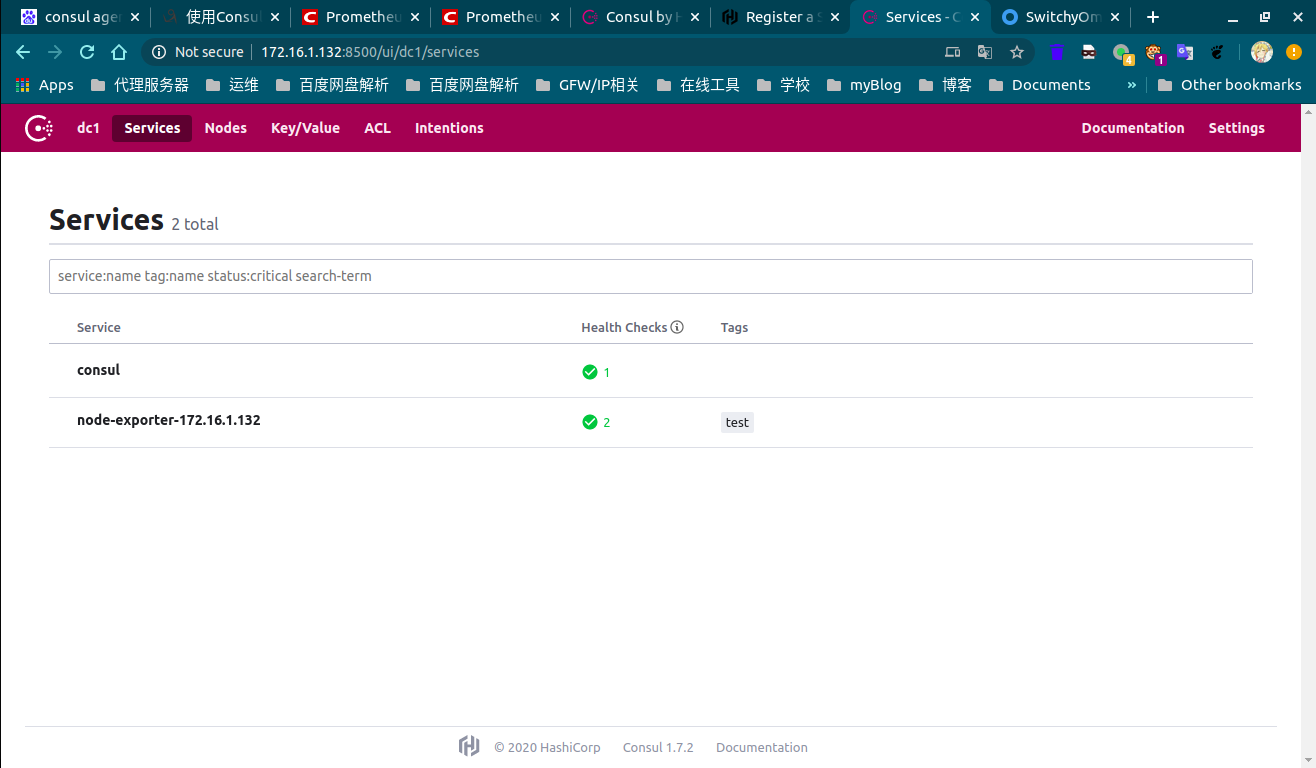
打开浏览器访问 http://172.16.1.132:8500/ui/dc1/services 查看是否成功注册.
如果想要注销该服务,需要使用:
curl -X PUT http://172.16.1.132:8500/v1/agent/service/deregister/node-exporter
- 配置
Prometheus实现自动服务发现
现在 Consul 服务已经启动完毕,并成功注册了一个服务,接下来,我们需要配置 Prometheus 来使用 Consul 自动服务发现,目的就是能够将上边添加的服务自动发现到 Prometheus 的 Targets 中,增加 prometheus.yml 配置如下:
...
- job_name: 'consul-prometheus'
  consul_sd_configs:
  - server: '172.16.1.132:8500'
    services: []
2
3
4
5
重启Promtheus的 Docker 容器:docker restart 594b53c2689c,后面那个短ID为 Prom 容器的ID.
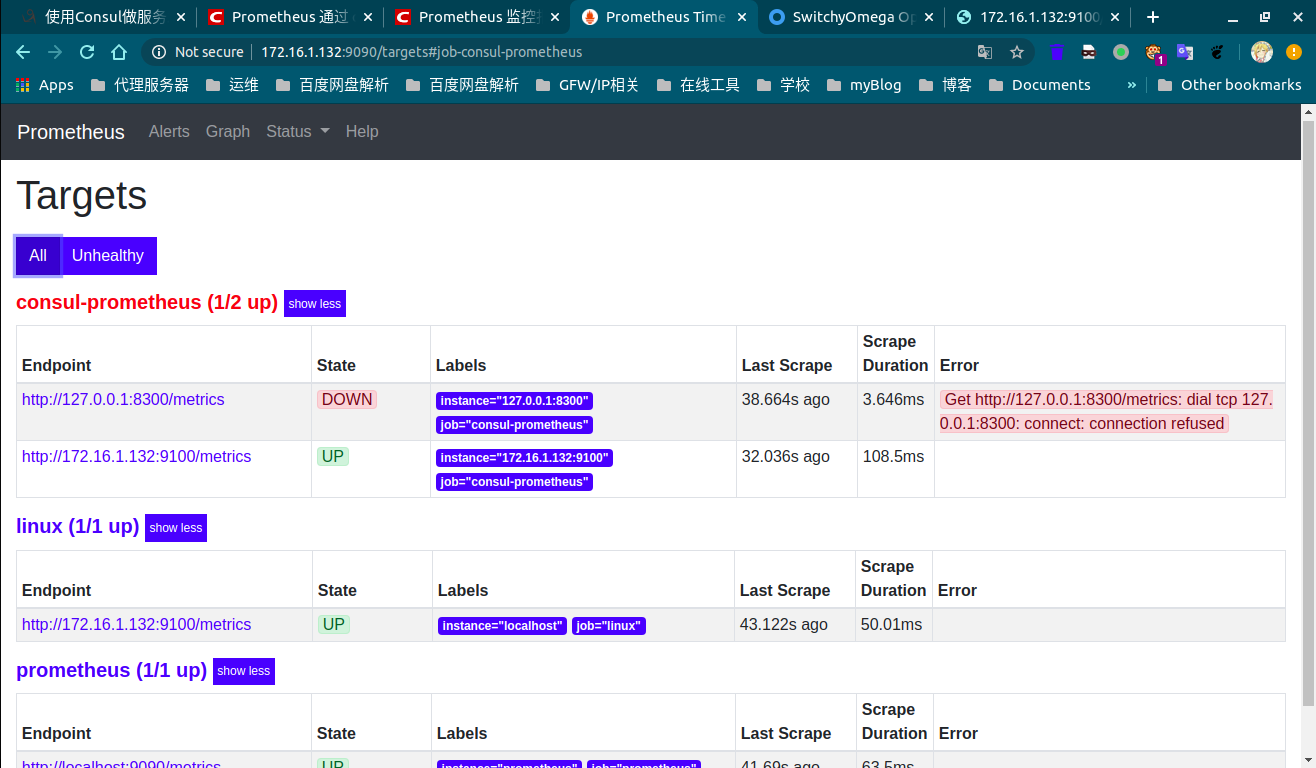
- 打开浏览器访问 http://172.16.1.132:9090/targets
ℹ️-----------以下内容为转载
可以看到,在 Targets 中能够成功的自动发现 Consul 中的 Services 信息,后期需要添加新的 Targets 时,只需要通过 API 往 Consul 中注册服务即可,Prometheus 就能自动发现该服务,是不是很方便。
不过,我们会发现有如下几个问题:
- 会发现 Prometheus 同时加载出来了默认服务 consul,这个是不需要的。
- 默认只显示 job 及 instance 两个标签,其他标签都默认属于 before relabeling 下,有些必要的服务信息,也想要在标签中展示,该如何操作呢?
- 如果需要自定义一些标签,例如 team、group、project 等关键分组信息,方便后边 alertmanager 进行告警规则匹配,该如何处理呢?
- 所有 Consul 中注册的 Service 都会默认加载到 Prometheus 下配置的 consul_prometheus 组,如果有多种类型的 exporter,如何在 Prometheus 中配置分配给指定类型的组,方便直观的区别它们?
以上问题,我们可以通过 Prometheus 配置中的 relabel_configs 参数来解决。
# 过滤标签
1️⃣ 问题一,我们可以配置relabel_configs 来实现标签过滤,只加载符合规则的服务。以上边为例,可以通过过滤 __meta_consul_tags 标签为 test的服务,relabel_config 向 Consul 注册服务的时候,只加载匹配 regex 表达式的标签的服务到自己的配置文件。修改 prometheus.yml配置如下:
...
- job_name: 'consul-prometheus'
  consul_sd_configs:
    - server: '172.30.12.167:8500'
      services: []
  relabel_configs:
    - source_labels: [__meta_consul_tags]
      regex: .*test.*
      action: keep
2
3
4
5
6
7
8
9
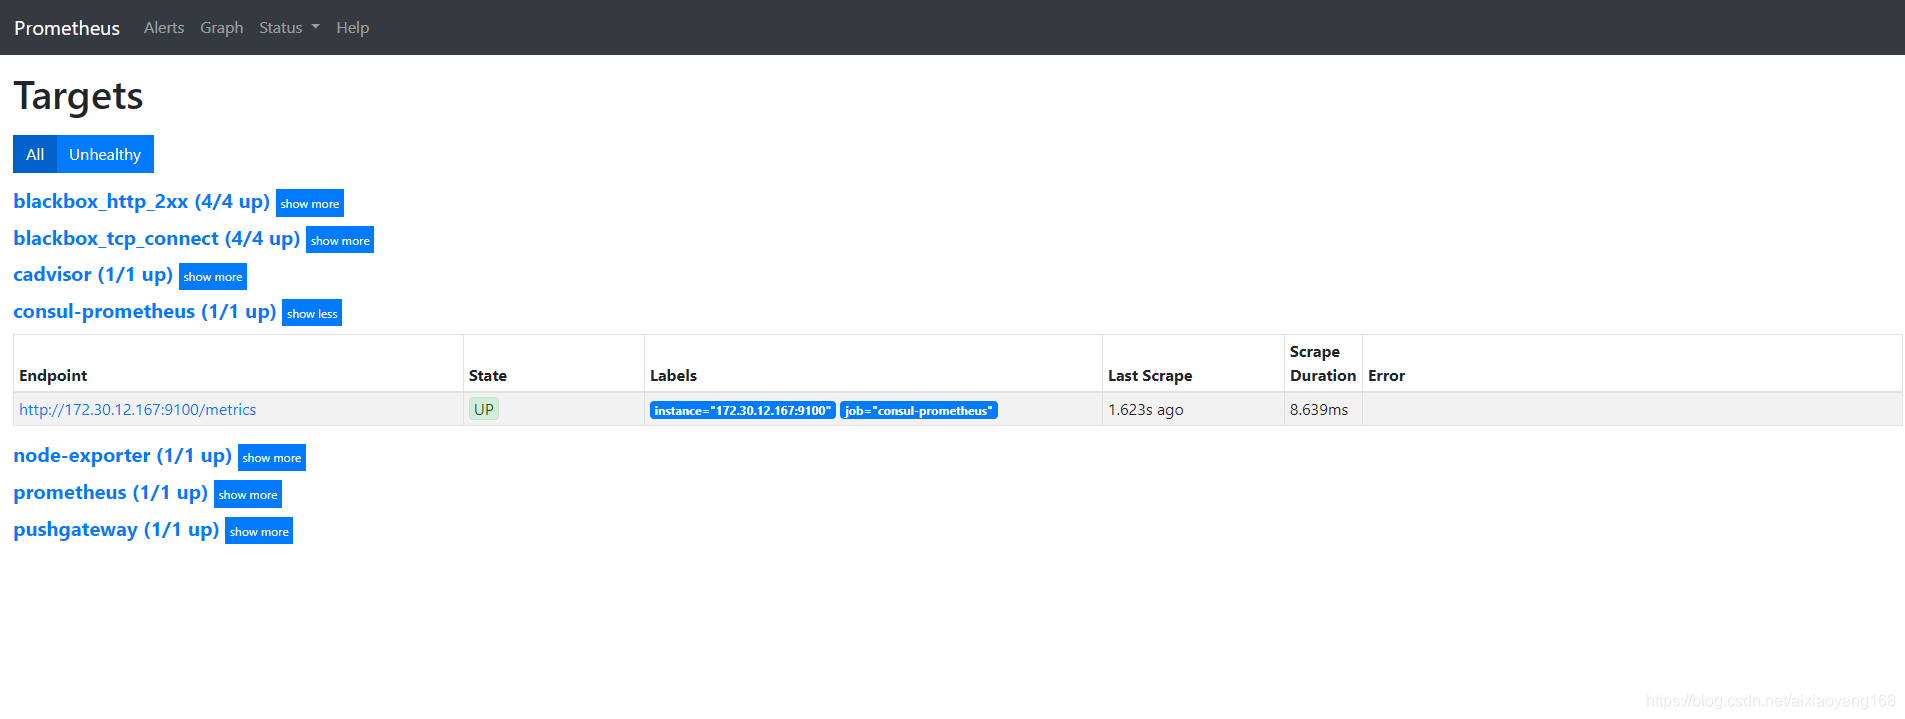
解释下,这里的relabel_configs配置作用为丢弃源标签中 __meta_consul_tags 不包含 test 标签的服务,__meta_consul_tags对应到 Consul 服务中的值为 "tags": ["test"],默认 consul 服务是不带该标签的,从而实现过滤。重启 Prometheus 可以看到现在只获取了 node-exporter-172.30.12.167 这个服务了。
# 添加标签
2️⃣&3️⃣问题二和问题三可以归为一类,就是将系统默认标签或者用户自定义标签转换成可视化标签,方便查看及后续 Alertmanager进行告警规则匹配分组。不过要实现给服务添加自定义标签,我们还得做一下修改,就是在注册服务时,将自定义标签信息添加到 Meta Data 数据中,具体可以参考 [这里](Consul Service - Agent HTTP API) 官网说明,下边来演示一下如何操作。
新建 consul-0.json 如下:
$ vim consul-0.json
{
  "ID": "node-exporter",
  "Name": "node-exporter-172.30.12.167",
  "Tags": [
    "test"
  ],
  "Address": "172.30.12.167",
  "Port": 9100,
  "Meta": {
    "app": "spring-boot",
    "team": "appgroup",
    "project": "bigdata"
  },
  "EnableTagOverride": false,
  "Check": {
    "HTTP": "http://172.30.12.167:9100/metrics",
    "Interval": "10s"
  },
  "Weights": {
    "Passing": 10,
    "Warning": 1
  }
}
2
3
4
5
6
7
8
9
10
11
12
13
14
15
16
17
18
19
20
21
22
23
24
说明一下:该 Json 文件为要注册的服务信息,同时往 Meta 信息中添加了 app=spring-boot,team=appgroup,project=bigdata 三组标签,目的就是为了方便告警分组使用。执行如下命令进行注册:
$ curl --request PUT --data @consul-0.json http://172.30.12.167:8500/v1/agent/service/register?replace-existing-checks=1

然后修改 prometheus.yml 配置如下:
...
- job_name: 'consul-prometheus'
  consul_sd_configs:
    - server: '172.30.12.167:8500'
      services: []
  relabel_configs:
    - source_labels: [__meta_consul_tags]
      regex: .*test.*
      action: keep
    - regex: __meta_consul_service_metadata_(.+)
      action: labelmap
2
3
4
5
6
7
8
9
10
11
解释一下,增加的配置作用为匹配 __meta_consul_service_metadata_开头的标签,将捕获到的内容作为新的标签名称,匹配到标签的的值作为新标签的值,而我们刚添加的三个自定义标签,系统会自动添加 __meta_consul_service_metadata_app=spring-boot、__meta_consul_service_metadata_team=appgroup、__meta_consul_service_metadata_project=bigdata 三个标签,经过 relabel 后,Prometheus 将会新增 app=spring-boot、team=appgroup、project=bigdata三个标签。重启 Prometheus 服务,可以看到新增了对应了三个自定义标签。

# 服务标签分类
4️⃣问题四,将自动发现的服务进行分类,本质上跟上边的处理方式一致,可以添加自定义的标签方式,通过标签来区分,二可以通过服务 Tag 来进行匹配来创建不同的类型 exporter 分组。这里我以第二种为例,通过给每个服务标记不同的 Tag,然后通过 relabel_configs来进行匹配区分。我们来更新一下原 node-exporter-172.30.12.167服务标签,同时注册一个其他类型 exporter 的服务如下:
$ vim consul-1.json
{
  "ID": "node-exporter",
  "Name": "node-exporter-172.30.12.167",
  "Tags": [
    "node-exporter"
  ],
  "Address": "172.30.12.167",
  "Port": 9100,
  "Meta": {
    "app": "spring-boot",
    "team": "appgroup",
    "project": "bigdata"
  },
  "EnableTagOverride": false,
  "Check": {
    "HTTP": "http://172.30.12.167:9100/metrics",
    "Interval": "10s"
  },
  "Weights": {
    "Passing": 10,
    "Warning": 1
  }
}

# 更新注册服务
$ curl --request PUT --data @consul-1.json http://172.30.12.167:8500/v1/agent/service/register?replace-existing-checks=1

$ vim consul-2.json
{
  "ID": "cadvisor-exporter",
  "Name": "cadvisor-exporter-172.30.12.167",
  "Tags": [
    "cadvisor-exporter"
  ],
  "Address": "172.30.12.167",
  "Port": 8080,
  "Meta": {
    "app": "docker",
    "team": "cloudgroup",
    "project": "docker-service"
  },
  "EnableTagOverride": false,
  "Check": {
    "HTTP": "http://172.30.12.167:8080/metrics",
    "Interval": "10s"
  },
  "Weights": {
    "Passing": 10,
    "Warning": 1
  }
}

# 注册服务
$ curl --request PUT --data @consul-2.json http://172.30.12.167:8500/v1/agent/service/register?replace-existing-checks=1
2
3
4
5
6
7
8
9
10
11
12
13
14
15
16
17
18
19
20
21
22
23
24
25
26
27
28
29
30
31
32
33
34
35
36
37
38
39
40
41
42
43
44
45
46
47
48
49
50
51
52
53
54
55
说明一下,我们更新了原 node-exporter-172.30.12.167 服务的标签为node-exporter,同时注册一个新类型 cadvisor-exporter-172.30.12.167 服务,并设置标签为cadvisor-exporter,以示区别。注册完毕,通过 Consul Web 控制台可以看到成功注册了这两个服务。

最后,我们修改 prometheus.yml 配置如下:
...
  - job_name: 'consul-node-exporter'
    consul_sd_configs:
      - server: '172.30.12.167:8500'
        services: []
    relabel_configs:
      - source_labels: [__meta_consul_tags]
        regex: .*node-exporter.*
        action: keep
      - regex: __meta_consul_service_metadata_(.+)
        action: labelmap

  - job_name: 'consul-cadvisor-exproter'
    consul_sd_configs:
      - server: '172.30.12.167:8500'
        services: []
    relabel_configs:
      - source_labels: [__meta_consul_tags]
        regex: .*cadvisor-exporter.*
        action: keep
      - regex: __meta_consul_service_metadata_(.+)
        action: labelmap
2
3
4
5
6
7
8
9
10
11
12
13
14
15
16
17
18
19
20
21
22
这里需要根据每种类型的 exporter 新增一个关联 job,同时 relabel_configs 中配置以 Tag 来做匹配区分。重启 Prometheus 服务,可以看到服务已经按照类型分类了,方便查看。

# 参考链接
- relabel_config :https://prometheus.io/docs/prometheus/latest/configuration/configuration/#relabel_config
- Consul Service - Agent HTTP API:https://www.consul.io/api/agent/service.html)
- CSDN @aixiaoyang168 :https://blog.csdn.net/aixiaoyang168/article/details/103022342